

Verify Encryption on a Mac
Firstly, go ahead and download CocoaPacketAnalyzer on your Mac and run it. You should see the startup screen with four large buttons.
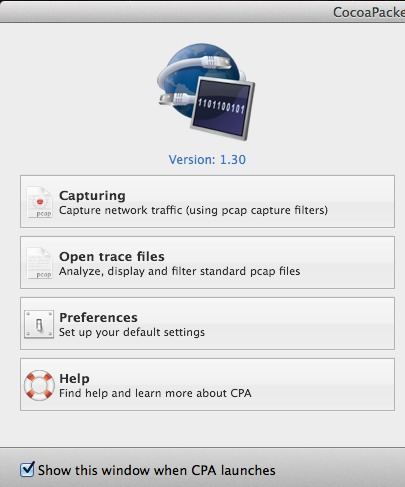 Capturing is what you’ll click on to start a capture of network traffic. If you save a capture session, it’s called a trace file and you can open those again later on using the second button. However, for our purposes, we just want to see the data is encrypted and won’t really be saving any of these captures.
Before we perform a capture, go ahead and click on Preferences to set up how we are going to capture the data. Click on Capture at the top and the only setting we need to check here is Capture Interface.
Capturing is what you’ll click on to start a capture of network traffic. If you save a capture session, it’s called a trace file and you can open those again later on using the second button. However, for our purposes, we just want to see the data is encrypted and won’t really be saving any of these captures.
Before we perform a capture, go ahead and click on Preferences to set up how we are going to capture the data. Click on Capture at the top and the only setting we need to check here is Capture Interface.
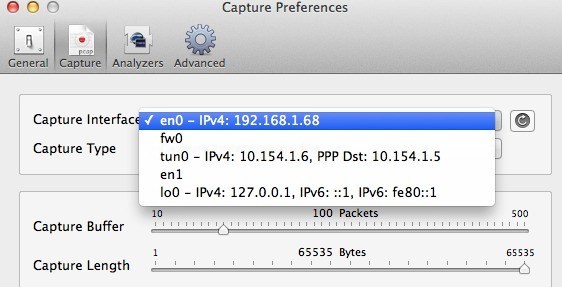 First, be sure to press the little Refresh button that is located to the right of the list box. When you click on the box, you’ll see a couple of options, all of which look confusing as heck. The only ones you’ll need to choose from are the ones that have IPv4 listed with some numbers after it. You don’t need to pick the one that has 127.0.0.1. You’ll want to pick the one that has the IP address for the connection you’re currently using. You can figure this out by going to System Preferences and then clicking on Network.
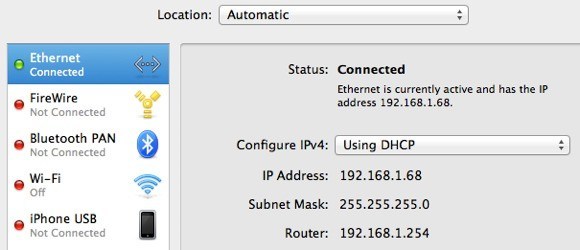 Click on the connection that has the green dot in the list box on the left and then check the IP address field on the right-hand section. As you can see, it says 192.168.1.x, so that matches the en0 – IP4 – 192.168.1.68 option in the dropdown list in the program. Now go ahead and close the Capture Preferences window to get back to the main screen.
Go ahead and click on Capturing and you’ll now see a new dialog pop up where you can pick a few settings and then start the capture.
Click on the connection that has the green dot in the list box on the left and then check the IP address field on the right-hand section. As you can see, it says 192.168.1.x, so that matches the en0 – IP4 – 192.168.1.68 option in the dropdown list in the program. Now go ahead and close the Capture Preferences window to get back to the main screen.
Go ahead and click on Capturing and you’ll now see a new dialog pop up where you can pick a few settings and then start the capture.
 Here you don’t need to change anything for our purposes, so to get start you just need to press Start. Before you do, however, there are some things to note. Firstly, you should try to close all program and taskbar programs running and only keep your browser window open. Network captures record tons of data and even a few seconds will result in more than a thousands rows of data. So to keep it simple, close everything and kill as many background processes as possible first, then click Start.
After doing that, immediately load one or two sites and then click Stop. You only want to capture for a few seconds and nothing more. It might even be a good idea to have the web addresses already typed into tabs in your browser and then you can just press Enter to load the pages once you start the capture.
Once you press Stop, you will see a window that looks like this:
Here you don’t need to change anything for our purposes, so to get start you just need to press Start. Before you do, however, there are some things to note. Firstly, you should try to close all program and taskbar programs running and only keep your browser window open. Network captures record tons of data and even a few seconds will result in more than a thousands rows of data. So to keep it simple, close everything and kill as many background processes as possible first, then click Start.
After doing that, immediately load one or two sites and then click Stop. You only want to capture for a few seconds and nothing more. It might even be a good idea to have the web addresses already typed into tabs in your browser and then you can just press Enter to load the pages once you start the capture.
Once you press Stop, you will see a window that looks like this:
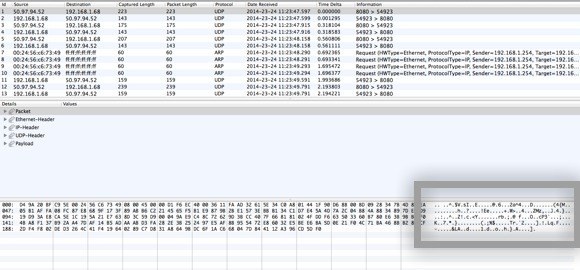 Now this may look like absolute gibberish, but that’s fine. All you need to do is scroll through the list at the top, which is in table format and look at the data you see in the box in the lower right, which I highlighted above. Now since there are probably thousands of rows, you can just keep pressing the down arrow key fast and looking at the data change at the bottom.
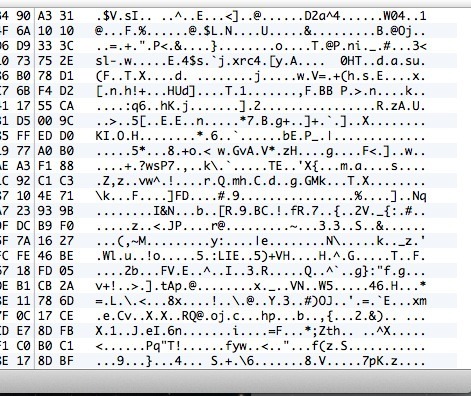 If your VPN connection is actually encrypted, every line you scroll through should show data that looks like the data in the above image. Since it’s unreadable and just a bunch of random characters, it’s encrypted. With an encrypted connection, nothing should be readable for any row in all those thousands of rows. Now let me show you what you’ll see on an unencrypted connection, such as when you’re not connected to a VPN:
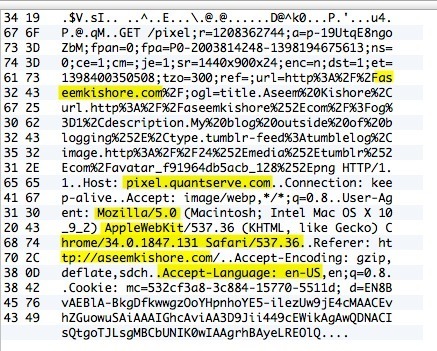 As you can see above, I can read a whole lot more stuff now that there is no encryption. I see I visited aseemkishore.com using a Mac and Safari and lots of other data. Not every packet will be this readable on an unencrypted connection, but for most packets you’ll be able to see the actual data, HTML code, protocol headers, etc. As I mentioned before, on an encrypted connection, not even a single packet will be understandable.
Verify Encryption on a PC
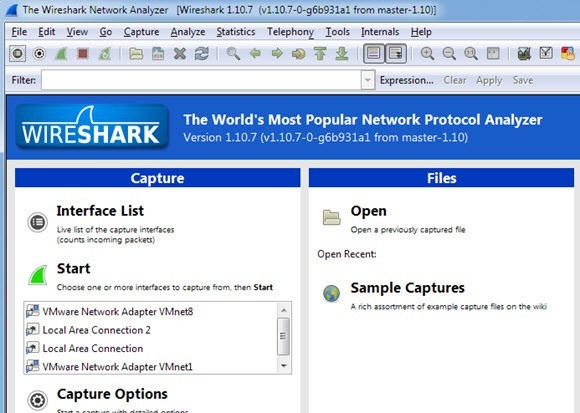
The process for checking on a PC is pretty much the same as I have shown above, except that you are using a different program called Wireshark. Once you download it, start it up and the home screen should look like this:
Like on the Mac, the first thing you’ll need to do is pick the interface (network interface) that you want to capture the data for. Click on Interface List and you’ll see the list of network interfaces. I like Wireshark a little better in that you can actually see how much data is being transferred on each interface, which makes it easy to see which one is the primary connection.

Go ahead and check the box next to the appropriate interface and then click Close. Now all you have to do is click on the Start button (below the Interface List button) and you’ll be good to go. You don’t have to change any other options or anything else for our purposes. Once you complete a capture, you should see an screen like this:
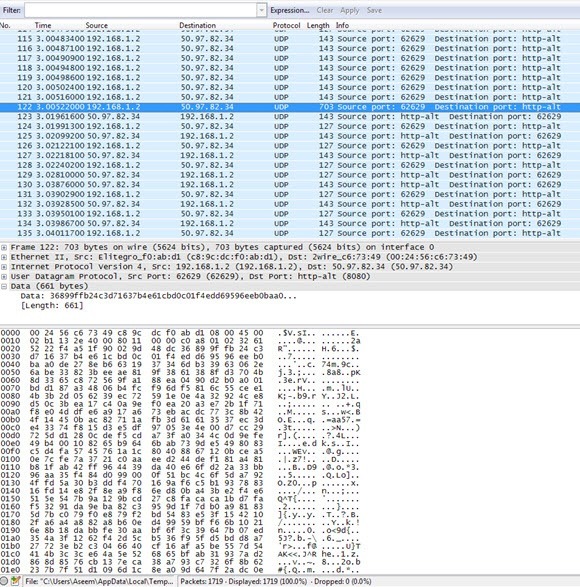
You may have to expand the window full-screen and then adjust the bottom and top panes accordingly, but as you can see the data is in the exact same format as CocoaPacketAnalyzer on the Mac. Scroll through the list at the top and make sure that data section is complete gibberish, which means your connection is encrypted. If you’re able to read any words or text, it means the data is not being encrypted. Make sure you browse through at least a couple of hundred rows quickly using the arrow keys.
Hopefully this post will put your mind at ease once you know your VPN connection is actually securely encrypted!


No comments:
Post a Comment